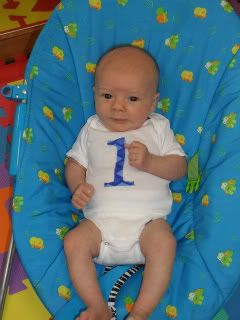
I decided when Iris and Jack were born that they needed little applique shirts for their monthly birthday pictures...
But since I didn't actually know how to appliqué, I looked for a book at the library. It sounded easy enough until I went to the fabric store and saw there was like 99 billion types of fusing. double sided, heat activated, water soluble.. WHAT!?
I was super confused. I've been sewing for years so you'd think these things come easily. They don't. One day I was at Ben Franklins in Bonney Lake and found a fabric glue stick. I thought, hey perfect! And it was!
I still didn't really know how to do it but after 3 ruined onesies I finally got it looking pretty good. Here is my very unprofessional tutorial!
You will need a pencil and paper to sketch a pattern, or you could print it off and cut it out. You'll need scissors, a fabric glue stick, your clothing item and some fabric.
Cut out a backwards two. After attempting to draw a backwards two for about an hour I finally was like, "derrrrr...." and drew a regular two and flipped it around. HA!
Trace your backwards two on the wrong side of your fabric. This will prevent any pencil marks showing up on the front incase you're like me; incapable of sewing straight.
Next you're going to apply glue; make sure and really get the corners because the machine (I found this out on the first and second ruined onesies!) will eat it!
Iron your clothing item.
Place your two where you want it and let it dry for a few minutes.
Cut out a piece of paper that fits behind your piece of fabric. This acts as a stabilizer!
Sew! I have so many options on my sewing machine and decided to chose this half moon looking things. It turned out all right. Not perfect because on the rounded part the stitching didn't come out evenly.
(this is the inside of your shirt) Gently remove the paper. I pulled too hard on one of the shirts that I ruined and a ton of the stitching came undone. Lesson learned!
Turn it right side out and admire!
Sell to your sister for $50.00... or not.
My next applique project I'd love to make a circle with reverse applique with a big J for Jacky. I'm sure I'll blog about it if that ever comes to pass. lol.


Those are ADORABLE! I wish i had done those with Ashton. I miss Ben Franklin!!! I love their die-cut machines. I remember going there on Friday afternoons to use them with felt and make t-shirts for the football games. Opps, got off topic for a second. Those turned out great! It would have taken me more then 3 onesies to get it!
ReplyDeleteOk, so I have a different way. Might not be better, but I think easier?
ReplyDeleteSo I print out a large number or letter using microsoft word. Cut it out, trace onto fabric, cut that out. Then I used "steam-a-seam2" double stick fusible web and iron it on. At the end I sew around the shape on the shirt to make sure it stays down. Maybe that's not easier . . but I like the web stuff. :)
Nice job with the tutorial. :)
ReplyDelete